| Previous | Next |
Part I Upgrading With Solaris Live Upgrade
1. Where to Find Solaris Installation Planning Information
2. Solaris Live Upgrade (Overview)
Solaris Live Upgrade Introduction
3. Solaris Live Upgrade (Planning)
4. Using Solaris Live Upgrade to Create a Boot Environment (Tasks)
5. Upgrading With Solaris Live Upgrade (Tasks)
6. Failure Recovery: Falling Back to the Original Boot Environment (Tasks)
7. Maintaining Solaris Live Upgrade Boot Environments (Tasks)
8. x86: Locating the GRUB Menu's menu.lst File (Tasks)
9. Upgrading the Solaris OS on a System With Non-Global Zones Installed
10. Solaris Live Upgrade (Examples)
11. Solaris Live Upgrade (Command Reference)
Solaris Live Upgrade Process
The following overview describes the tasks necessary to create a copy of the current boot environment, upgrade the copy, and switch the upgraded copy to become the active boot environment. The fallback process of switching back to the original boot environment is also described. Figure 2-1 describes this complete Solaris Live Upgrade process.
Figure 2-1 Solaris Live Upgrade Process
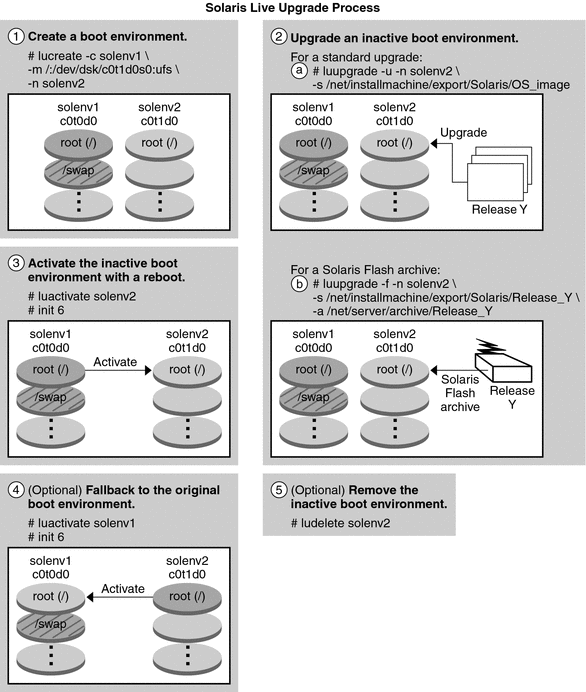
The following sections describe the Solaris Live Upgrade process.
A new boot environment can be created on a physical slice or a logical volume:
Creating a Boot Environment
The process of creating a boot environment provides a method of copying critical file systems from an active boot environment to a new boot environment. The disk is reorganized if necessary, file systems are customized, and the critical file systems are copied to the new boot environment.
File System Types
Solaris Live Upgrade distinguishes between two file system types: critical file systems and shareable. The following table describes these file system types.
File System Type |
Description |
Examples and More Information |
|---|---|---|
Critical file systems |
Critical file systems are required by the Solaris OS. These file systems are separate mount points in the vfstab of the active and inactive boot environments. These file systems are always copied from the source to the inactive boot environment. Critical file systems are sometimes referred to as nonshareable. |
Examples are root (/), /usr, /var, or /opt. |
Shareable file systems |
Shareable file systems are user-defined files such as /export that contain the same mount point in the vfstab in both the active and inactive boot environments. Therefore, updating shared files in the active boot environment also updates data in the inactive boot environment. When you create a new boot environment, shareable file systems are shared by default. But you can specify a destination slice and then the file systems are copied. |
/export is an example of a file system that can be shared. For more detailed information about shareable file systems, see Guidelines for Selecting Slices for Shareable File Systems. |
Swap |
Swap is a special shareable file system. Like a shareable file system, all swap slices are shared by default. But, if you specify a destination directory for swap, the swap slice is copied. |
For procedures about reconfiguring swap, see To Create a Boot Environment and Reconfiguring Swap. |
Creating RAID-1 Volumes on File Systems
Solaris Live Upgrade can create a boot environment with RAID-1 volumes (mirrors) on file systems. For an overview, see Creating a Boot Environment With RAID-1 Volume File Systems.
Copying File Systems
The process of creating a new boot environment begins by identifying an unused slice where a critical file system can be copied. If a slice is not available or a slice does not meet the minimum requirements, you need to format a new slice.
After the slice is defined, you can reconfigure the file systems on the new boot environment before the file systems are copied into the directories. You reconfigure file systems by splitting and merging them, which provides a simple way of editing the vfstab to connect and disconnect file system directories. You can merge file systems into their parent directories by specifying the same mount point. You can also split file systems from their parent directories by specifying different mount points.
After file systems are configured on the inactive boot environment, you begin the automatic copy. Critical file systems are copied to the designated directories. Shareable file systems are not copied, but are shared. The exception is that you can designate some shareable file systems to be copied. When the file systems are copied from the active to the inactive boot environment, the files are directed to the new directories. The active boot environment is not changed in any way.
For procedures to split or merging file systems |
|
For an overview of creating a boot environment with RAID–1 volume file systems |
Examples of Creating a New Boot Environment
The following figures illustrate various ways of creating new boot environments.
Figure 2-2 shows that critical file system root (/) has been copied to another slice on a disk to create a new boot environment. The active boot environment contains the root (/) file system on one slice. The new boot environment is an exact duplicate with the root (/) file system on a new slice. The file systems /swap and /export/home are shared by the active and inactive boot environments.
Figure 2-2 Creating an Inactive Boot Environment – Copying the root (/) File System
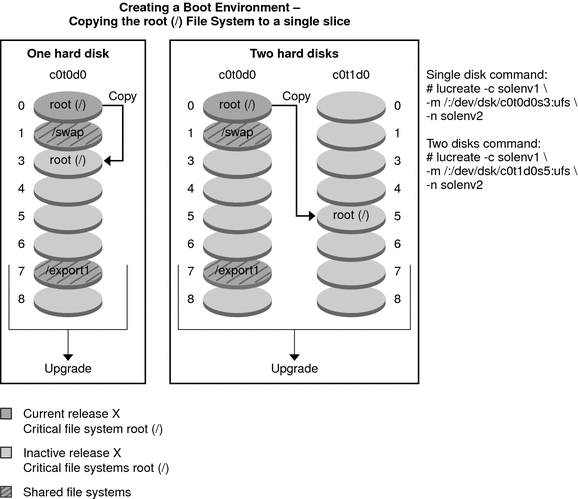
Figure 2-3 shows critical file systems that have been split and have been copied to slices on a disk to create a new boot environment. The active boot environment contains the root (/) file system on one slice. On that slice, the root (/) file system contains the /usr, /var, and /opt directories. In the new boot environment, the root (/) file system is split and /usr and /opt are put on separate slices. The file systems /swap and /export/home are shared by both boot environments.
Figure 2-3 Creating an Inactive Boot Environment – Splitting File Systems
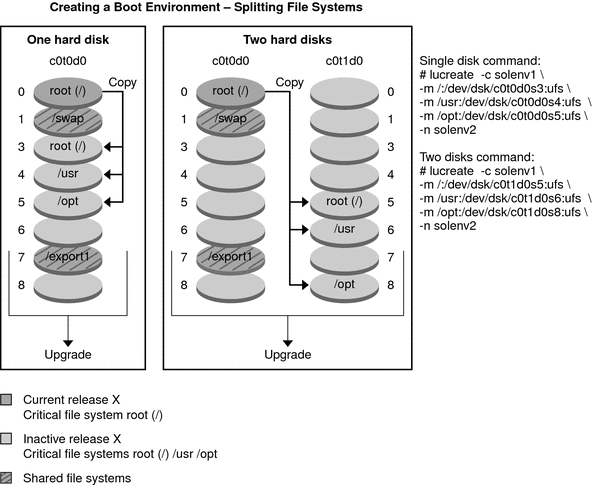
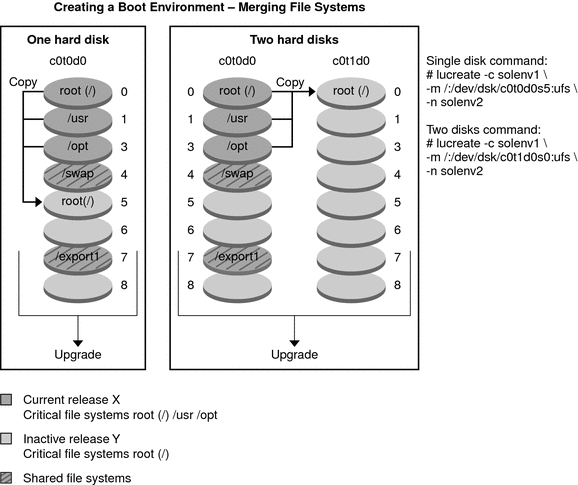
Figure 2-4 shows critical file systems that have been merged and have been copied to slices on a disk to create a new boot environment. The active boot environment contains the root (/) file system, /usr, /var, and /opt with each file system on their own slice. In the new boot environment, /usr and /opt are merged into the root (/) file system on one slice. The file systems /swap and /export/home are shared by both boot environments.
Figure 2-4 Creating an Inactive Boot Environment – Merging File Systems
Creating a Boot Environment With RAID-1 Volume File Systems
Solaris Live Upgrade uses Solaris Volume Manager technology to create a boot environment that can contain file systems encapsulated in RAID-1 volumes. Solaris Volume Manager provides a powerful way to reliably manage your disks and data by using volumes. Solaris Volume Manager enables concatenations, stripes, and other complex configurations. Solaris Live Upgrade enables a subset of these tasks, such as creating a RAID-1 volume for the root (/) file system.
A volume can group disk slices across several disks to transparently appear as a single disk to the OS. Solaris Live Upgrade is limited to creating a boot environment for the root (/) file system that contains single-slice concatenations inside a RAID-1 volume (mirror). This limitation is because the boot PROM is restricted to choosing one slice from which to boot.
How to Manage Volumes With Solaris Live Upgrade
When creating a boot environment, you can use Solaris Live Upgrade to manage the following tasks.
Detach a single-slice concatenation (submirror) from a RAID-1 volume (mirror). The contents can be preserved to become the content of the new boot environment if necessary. Because the contents are not copied, the new boot environment can be quickly created. After the submirror is detached from the original mirror, the submirror is no longer part of the mirror. Reads and writes on the submirror are no longer performed through the mirror.
Create a boot environment that contains a mirror.
Attach a maximum of three single-slice concatenations to the newly created mirror.
You use the lucreate command with the -m option to create a mirror, detach submirrors, and attach submirrors for the new boot environment.
Note - If VxVM volumes are configured on your current system, the lucreate command can create a new boot environment. When the data is copied to the new boot environment, the Veritas file system configuration is lost and a UFS file system is created on the new boot environment.
For step-by-step procedures |
|
For an overview of creating RAID-1 volumes when installing |
|
For in-depth information about other complex Solaris Volume Manager configurations that are not supported if you are using Solaris Live Upgrade |
Chapter 2, Storage Management Concepts, in Solaris Volume Manager Administration Guide |
Mapping Solaris Volume Manager Tasks to Solaris Live Upgrade
Solaris Live Upgrade manages a subset of Solaris Volume Manager tasks. Table 2-1 shows the Solaris Volume Manager components that Solaris Live Upgrade can manage.
Table 2-1 Classes of Volumes
Term |
Description |
|---|---|
A RAID-0 volume. If slices are concatenated, the data is written to the first available slice until that slice is full. When that slice is full, the data is written to the next slice, serially. A concatenation provides no data redundancy unless it is contained in a mirror. |
|
A RAID-1 volume. See RAID-1 volume. |
|
A class of volume that replicates data by maintaining multiple copies. A RAID-1 volume is sometimes called a mirror. A RAID-1 volume is composed of one or more RAID-0 volumes that are called submirrors. |
|
A class of volume that can be a stripe or a concatenation. These components are also called submirrors. A stripe or concatenation is the basic building block for mirrors. |
|
A state database stores information about disk about the state of your Solaris Volume Manager configuration. The state database is a collection of multiple, replicated database copies. Each copy is referred to as a state database replica. The state database tracks the location and status of all known state database replicas. |
|
state database replica |
A copy of a state database. The replica ensures that the data in the database is valid. |
See RAID-0 volume. |
|
A group of physical slices or other volumes that appear to the system as a single logical device. A volume is functionally identical to a physical disk in the view of an application or file system. In some command-line utilities, a volume is called a metadevice. |
Examples of Using Solaris Live Upgrade to Create RAID-1 Volumes
The following examples present command syntax for creating RAID-1 volumes for a new boot environment.
Create RAID-1 Volume on Two Physical Disks
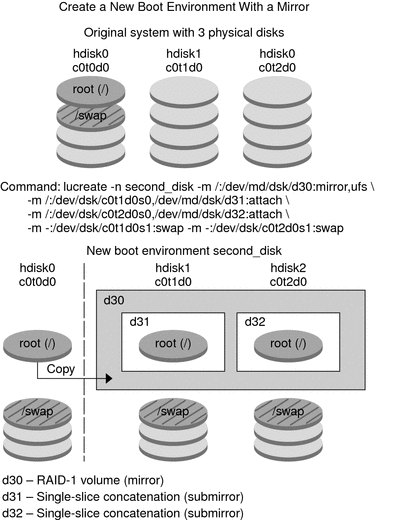
Figure 2-5 shows a new boot environment with a RAID-1 volume (mirror) that is created on two physical disks. The following command created the new boot environment and the mirror.
# lucreate -n second_disk -m /:/dev/md/dsk/d30:mirror,ufs \ -m /:/dev/dsk/c0t1d0s0,/dev/md/dsk/d31:attach -m /:/dev/dsk/c0t2d0s0,/dev/md/dsk/d32:attach \ -m -:/dev/dsk/c0t1d0s1:swap -m -:/dev/dsk/c0t2d0s1:swap
This command performs the following tasks:
Creates a new boot environment, second_disk.
Creates a mirror d30 and configures a UFS file system.
Creates a single-device concatenation on slice 0 of each physical disk. The concatenations are named d31 and d32.
Adds the two concatenations to mirror d30.
Copies the root (/) file system to the mirror.
Configures files systems for swap on slice 1 of each physical disk.
Figure 2-5 Create a Boot Environment and Create a Mirror
Create a Boot Environment and Use the Existing Submirror
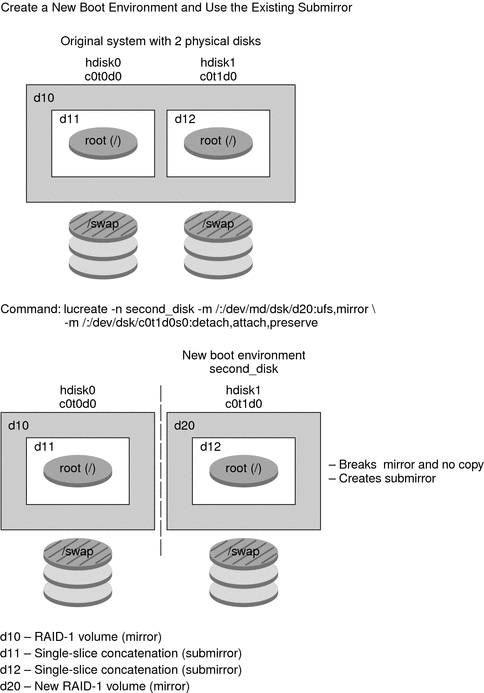
Figure 2-6 shows a new boot environment that contains a RAID-1 volume (mirror). The following command created the new boot environment and the mirror.
# lucreate -n second_disk -m /:/dev/md/dsk/d20:ufs,mirror \ -m /:/dev/dsk/c0t1d0s0:detach,attach,preserve
This command performs the following tasks:
Creates a new boot environment, second_disk.
Breaks mirror d10 and detaches concatenation d12.
Preserves the contents of concatenation d12. File systems are not copied.
Creates a new mirror d20. You now have two one-way mirrors d10 and d20.
Attaches concatenation d12 to mirror d20.
Figure 2-6 Create a Boot Environment and Use the Existing Submirror
Upgrading a Boot Environment
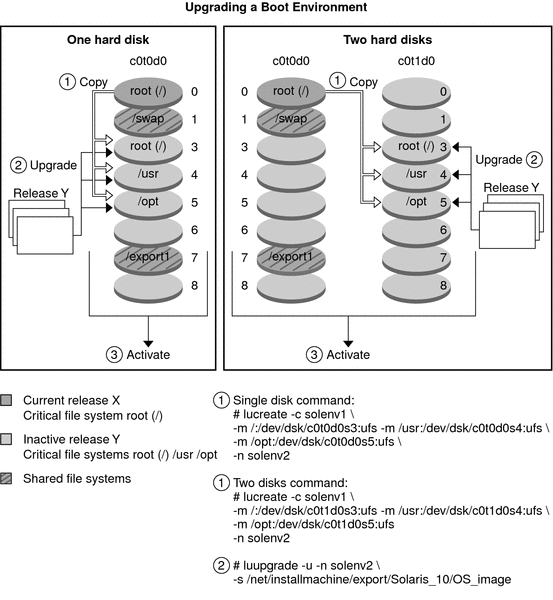
After you have created a boot environment, you can perform an upgrade on the boot environment. As part of that upgrade, the boot environment can contain RAID-1 volumes (mirrors) for any file systems. Or the boot environment can have non-global zones installed. The upgrade does not affect any files in the active boot environment. When you are ready, you activate the new boot environment, which then becomes the current boot environment.
For procedures about upgrading a boot environment |
|
For an example of upgrading a boot environment with a RAID–1 volume file system |
Example of Detaching and Upgrading One Side of a RAID-1 Volume (Mirror) |
For procedures about upgrading with non-global zones |
Chapter 9, Upgrading the Solaris OS on a System With Non-Global Zones Installed |
Figure 2-7 shows an upgrade to an inactive boot environment.
Figure 2-7 Upgrading an Inactive Boot Environment
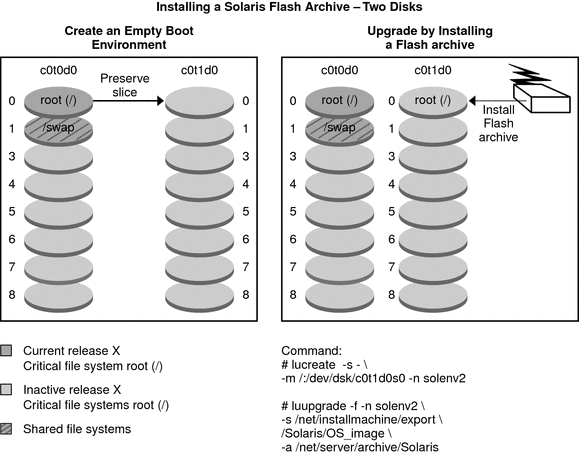
Rather than an upgrade, you can install a Solaris Flash archive on a boot environment. The Solaris Flash installation feature enables you to create a single reference installation of the Solaris OS on a system. This system is called the master system. Then, you can replicate that installation on a number of systems that are called clone systems. In this situation, the inactive boot environment is a clone. When you install the Solaris Flash archive on a system, the archive replaces all the files on the existing boot environment as an initial installation would.
For procedures about installing a Solaris Flash archive, see Installing Solaris Flash Archives on a Boot Environment.
The following figures show an installation of a Solaris Flash archive on an inactive boot environment. Figure 2-8 shows a system with a single hard disk. Figure 2-9 shows a system with two hard disks.
Figure 2-8 Installing a Solaris Flash Archive on a Single Disk
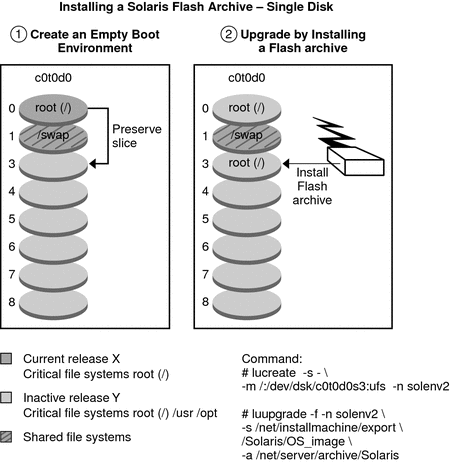
Figure 2-9 Installing a Solaris Flash Archive on Two Disks
Activating a Boot Environment
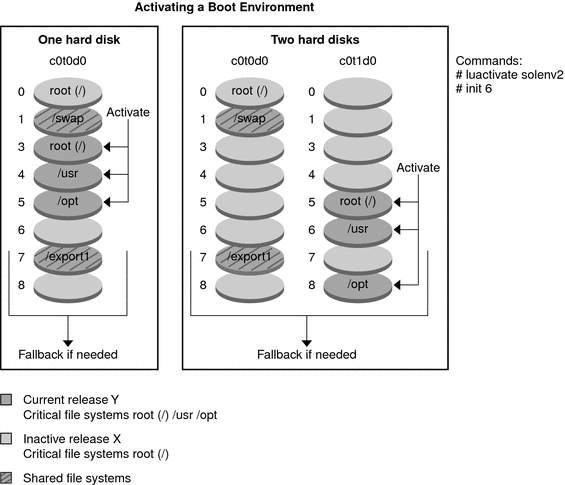
When you are ready to switch and make the new boot environment active, you quickly activate the new boot environment and reboot. Files are synchronized between boot environments the first time that you boot a newly created boot environment. “Synchronize” means that certain system files and directories are copied from the last-active boot environment to the boot environment being booted. When you reboot the system, the configuration that you installed on the new boot environment is active. The original boot environment then becomes an inactive boot environment.
For procedures about activating a boot environment |
|
For information about synchronizing the active and inactive boot environment |
Figure 2-10 shows a switch after a reboot from an inactive to an active boot environment.
Figure 2-10 Activating an Inactive Boot Environment
Falling Back to the Original Boot Environment
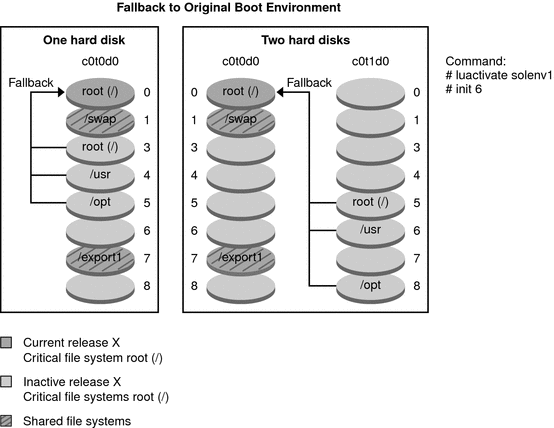
If a failure occurs, you can quickly fall back to the original boot environment with an activation and reboot. The use of fallback takes only the time to reboot the system, which is much quicker than backing up and restoring the original. The new boot environment that failed to boot is preserved. The failure can then be analyzed. You can only fall back to the boot environment that was used by luactivate to activate the new boot environment.
You fall back to the previous boot environment the following ways:
Problem |
Action |
|---|---|
The new boot environment boots successfully, but you are not happy with the results. |
Run the luactivate command with the name of the previous boot environment and reboot. x86 only - Starting with the Solaris 10 1/06 release, you can fall back by selecting the original boot environment that is found on the GRUB menu. The original boot environment and the new boot environment must be based on the GRUB software. Booting from the GRUB menu does not synchronize files between the old and new boot environments. For more information about synchronizing files, see Forcing a Synchronization Between Boot Environments. |
The new boot environment does not boot. |
Boot the fallback boot environment in single-user mode, run the luactivate command, and reboot. |
You cannot boot in single-user mode. |
Perform one of the following:
|
For procedures to fall back, see Chapter 6, Failure Recovery: Falling Back to the Original Boot Environment (Tasks).
Figure 2-11 shows the switch that is made when you reboot to fallback.
Figure 2-11 Fallback to the Original Boot Environment
Maintaining a Boot Environment
You can also do various maintenance activities such as checking status, renaming, or deleting a boot environment. For maintenance procedures, see Chapter 7, Maintaining Solaris Live Upgrade Boot Environments (Tasks).
| Previous | Next |