| Previous | Next |
Part I Upgrading With Solaris Live Upgrade
1. Where to Find Solaris Installation Planning Information
2. Solaris Live Upgrade (Overview)
3. Solaris Live Upgrade (Planning)
4. Using Solaris Live Upgrade to Create a Boot Environment (Tasks)
5. Upgrading With Solaris Live Upgrade (Tasks)
6. Failure Recovery: Falling Back to the Original Boot Environment (Tasks)
7. Maintaining Solaris Live Upgrade Boot Environments (Tasks)
8. x86: Locating the GRUB Menu's menu.lst File (Tasks)
9. Upgrading the Solaris OS on a System With Non-Global Zones Installed
10. Solaris Live Upgrade (Examples)
Example of Upgrading With Solaris Live Upgrade
Example of Migrating From an Existing Volume to a Solaris Volume Manager RAID-1 Volume
Example of Creating an Empty Boot Environment and Installing a Solaris Flash Archive
11. Solaris Live Upgrade (Command Reference)
Example of Detaching and Upgrading One Side of a RAID-1 Volume (Mirror)
This example shows you how to do the following tasks:
Create a RAID-1 volume (mirror) on a new boot environment
Break the mirror and upgrade one half of the mirror
Attach the other half of the mirror, the concatenation, to the new mirror
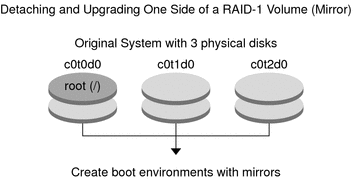
Figure 10-1 shows the current boot environment, which contains three physical disks.
Figure 10-1 Detaching and Upgrading One Side of a RAID-1 Volume (Mirror)

Create a new boot environment, second_disk, that contains a mirror.
The following command performs these tasks.
lucreate configures a UFS file system for the mount point root (/). A mirror, d10, is created. This mirror is the receptacle for the current boot environment's root (/) file system, which is copied to the mirror d10. All data on the mirror d10 is overwritten.
Two slices, c0t1d0s0 and c0t2d0s0, are specified to be used as submirrors. These two submirrors are attached to mirror d10.
# lucreate -c first_disk -n second_disk \ -m /:/dev/md/dsk/d10:ufs,mirror \ -m /:/dev/dsk/c0t1d0s0:attach \ -m /:/dev/dsk/c0t2d0s0:attach
Activate the second_disk boot environment.
# /sbin/luactivate second_disk
# init 6
Create another boot environment, third_disk.
The following command performs these tasks.
lucreate configures a UFS file system for the mount point root (/). A mirror, d20, is created.
Slice c0t1d0s0 is removed from its current mirror and is added to mirror d20. The contents of the submirror, the root (/) file system, are preserved and no copy occurs.
# lucreate -n third_disk \ -m /:/dev/md/dsk/d20:ufs,mirror \ -m /:/dev/dsk/c0t1d0s0:detach,attach,preserve
Upgrade the new boot environment, third_disk
# luupgrade -u -n third_disk \ -s /net/installmachine/export/Solaris_11/OS_image
Add a patch to the upgraded boot environment.
# luupgrade -t n third_disk -s /net/patches 222222-01
Activate the third_disk boot environment to make this boot environment the currently running system.
# /sbin/luactivate third_disk
# init 6
Delete the boot environment second_disk.
# ludelete second_disk
The following commands perform these tasks.
Clear mirror d10.
Check for the number for the concatenation of c0t2d0s0.
Attach the concatenation that is found by the metastat command to the mirror d20. The metattach command synchronizes the newly attached concatenation with the concatenation in mirror d20. All data on the concatenation is overwritten.
# metaclear d10 # metastat -p | grep c0t2d0s0
dnum 1 1 c0t2d0s0
# metattach d20 dnum
- num
Is the number found in the metastat command for the concatenation
The new boot environment, third_disk, has been upgraded and is the currently running system. third_disk contains the root (/) file system that is mirrored.
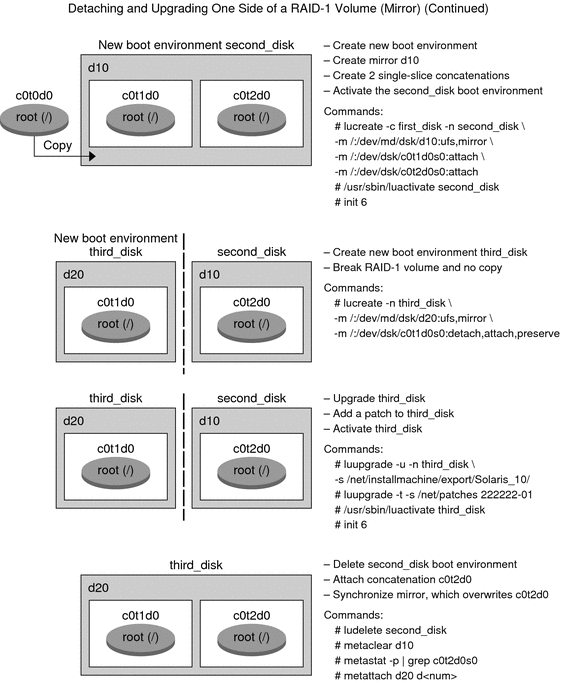
Figure 10-2 shows the entire process of detaching a mirror and upgrading the mirror by using the commands in the preceding example.
Figure 10-2 Detaching and Upgrading One Side of a RAID-1 Volume (Mirror) (continued)

| Previous | Next |